


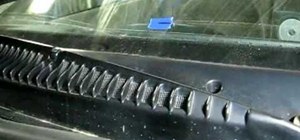
Check out this instructional RV video that demonstrates how to use the patio awning on your recreational vehicle. Check on these routinely: the lift handle (make sure that the spring is working correctly), and a knob on the back that loosens up the inner arm, and the locking mechanism (which is located on both the front and back arm). Go ahead and open up the awning by taking your awning rod and reach up to the top and unlock it which is always located on the front and none in the back. Then go to the awning strap which is directly in the middle of the awning and take the rod and pull it down then walk over and slide the inner arm all the way up to the top until they lock in. Put pressure down on the arm and tighten the knob. Do this for both sides of the awning. Then set your awning to your desired height, there should be a lift handle closest end to the RV and lift it until your desired height and lock. Keeping in mind you always want to have one side high and one side low at a time. So that way if it rains the water has one side to flow off of. Usually it would be the side to the back of the coach that should be lower. To put it back in you just reverse the steps you took to put it up. Repeating these steps on both sides. Making sure to keep a good grip on the strap while bringing the awning back up. Learn the ins and out of RVing with this RV tutorial video that shows you how to correctly place your RV patio awning.
Just updated your iPhone? You'll find new emoji, enhanced security, podcast transcripts, Apple Cash virtual numbers, and other useful features. There are even new additions hidden within Safari. Find out what's new and changed on your iPhone with the iOS 17.4 update.


Be the First to Comment
Share Your Thoughts